Problem
Now that Vsphere 7u1 is out (yay!), you, too, can run Vsphere with Kubernetes without NSX-T. But for the home lab of a former developer, what does that look like? We have our fancy Ubiquiti networking but we're not sure how to make the right networks. We also don't know how to make those networks work on our Vsphere gear. If you're approaching Vsphere with Kubernetes from an app down perspective (that is, you're better at Kubernetes than you are at Vsphere), we're going to explain how you can set up your network to prepare for enabling Workload Management.
NOTE: If you're already good at Vsphere, I stronly recommend you simply follow Cormac Hogan's 4-part series on the topic of deploying Vsphere with Kubernetes using HA Proxy. This post is meant for those of us who haven't managed Vsphere ecosystems full-time before.
Please also note, this post only covers the network setup. There is still work to be done to actually enable Workload Management. I'll refer again to Cormac's series above for those steps.
Solution
Here's the workflow we'll need to follow:
- [Ubiquiti] Identify, or create, three networks (managment, load balancer, workload)
- [Ubiquiti] Configure port profiles to map said networks
- [Ubiquiti] Assign Port Profiles to physical ports
- [Vsphere] Create a DVS and Port Groups
- [Vsphere] Migrate vmk0 interface(s) to the DVS (if not done already)
- [Vsphere] Create a Distributed Port Group for each network above
- [Vsphere] Deploy HA Proxy as a litmus test
Assumptions
This post is written very much for people with home networks using Ubiquiti's gear. I'm assuming that, like me, you have access to the management UI for your network as well as as least on Ubiquiti managed switch.
Additionally, I only have a single physical ESXi host. I'm using two of the NICs on this machine. Your setup will look different from mine. Please consider this post a general guideline on your journey.
The two NICs I'm using are as follows:
VMNIC0 - connected to my 'management' network.
VMNIC1 - connected to all the other VLANs needed for WCP (more details later in the post).
Let's get started.
Create Networks
As per the docs (and Cormac's series), you'll need three networks. When you create them, be sure to tag them with a VLAN ID and disable DHCP.
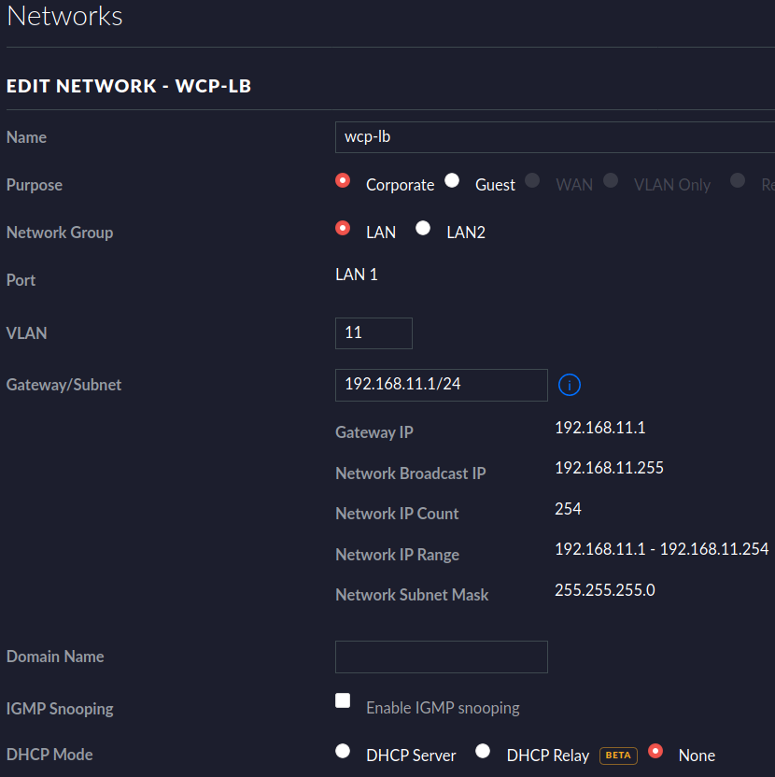
Here's my 'load balancer' network as an example.
And here are all three of my networks.

In the image above are my three networks.
wcp-lb: My load balancer network. I created this for Workload Management.wcp-workload: My workload network. I created this for Workload Management.lab-mgmt: My 'original' /24 network when I build my lab. I've had this for a long time. Since the 'management' network is where your ESXi hosts and vCenter need to live, I just went with using this one instead of creating a new one.
Configure Ubiquiti Port Profiles
Now that I've created the networks, how do I tell my network gear where the traffic for those networks should go? The work is two-fold. 1) Create the Port Profile and 2) apply said Port Profile to the correct physical port(s) on your Ubiquiti switch.
Create the Port Profile. For me, this was Settings -> Profiles -> "Switch Ports" tab.
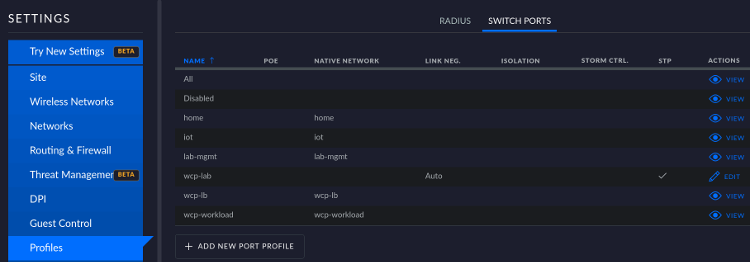
You'll notice that, in the image above, only one Port Profile is editable (wcp-lab). That's because all of the others were created for me when I created those other networks. You'll want to "Add New Port Profile".
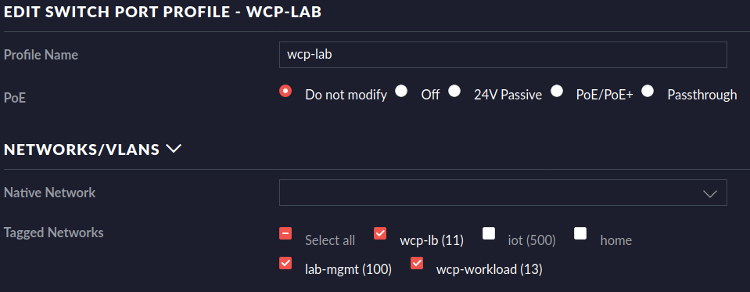
When creating yours, be sure to 1) disable the Native VLAN and 2) check all the networks (i.e. VLANs) for your wcp environment. Here's that wcp-lab Port Profile up close.
Assign Port Profiles to Physical Ports
At the start of this post, I said I was using two NICs on my physical host. One NIC shows as VMNIC0, the other shows as VMNIC1. Know which port on your switch maps to which NIC on your host before proceeding.
Go to Devices -> your managed switch -> and click the managed switch.
For the port connected to VMNIC0
Assign it just the port profile for your 'management' network.
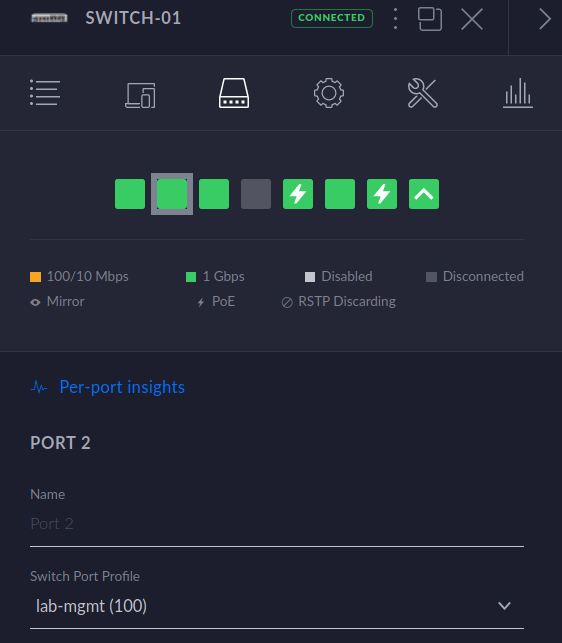
For the port connected to VMNIC1
Assign it the port profile you created that has all the VLANs tagged in it. For me, this is my wcp-lab Port Profile.

You now have your Ubiquiti gear configured to use those two ports for handling traffic for your WCP deployment.
Create a Distributed Virtual Switch (DVS) and Port Groups
We're going to log into vCenter now.
Start by going to "Networking". Create a new Virtual Distributed Switch. For me, I only created one Uplink for simplicity. Leave everything else default.
After creating the DVS, create one Distributed Port Group for each network you created/identified in Ubiquiti (that's three - management, load balancer, and workload). When creating each Distributed Port Group, be sure to configure it to use the VLAN ID associated with each network. Leave everything else at default values.
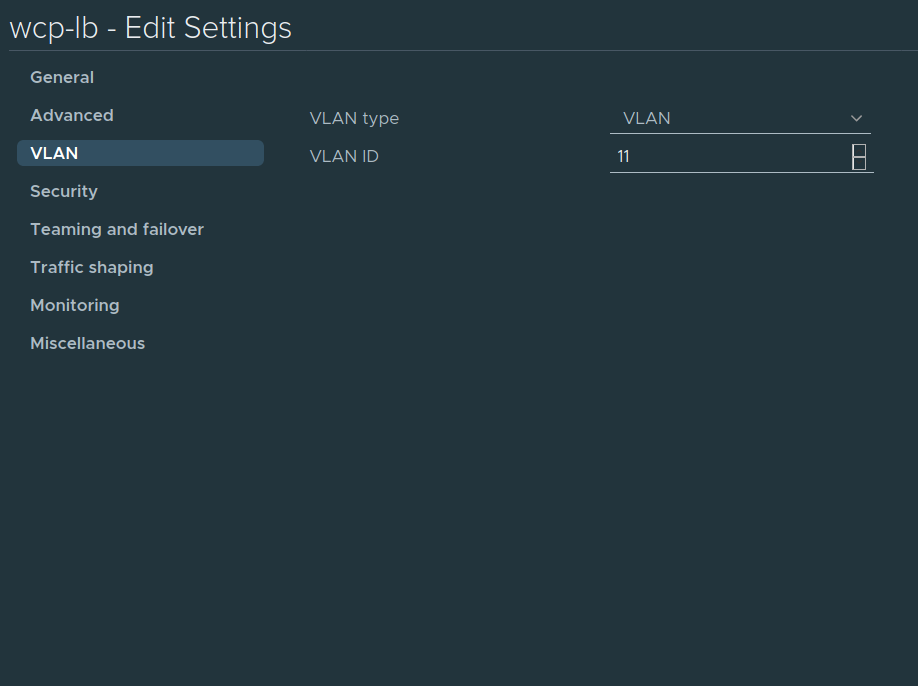
For example, below is the Distributed Port Group for my 'load balancer' network. Look above earlier in this post and you'll see that this has the VLAN ID of 11 in my Ubiquiti gear.
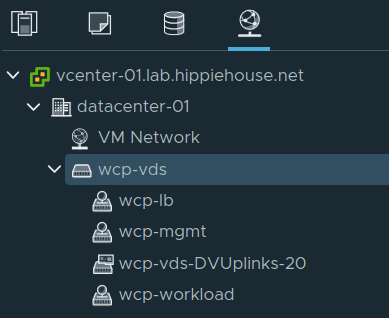
After creating the DVS and the DPGs, this is what I have.
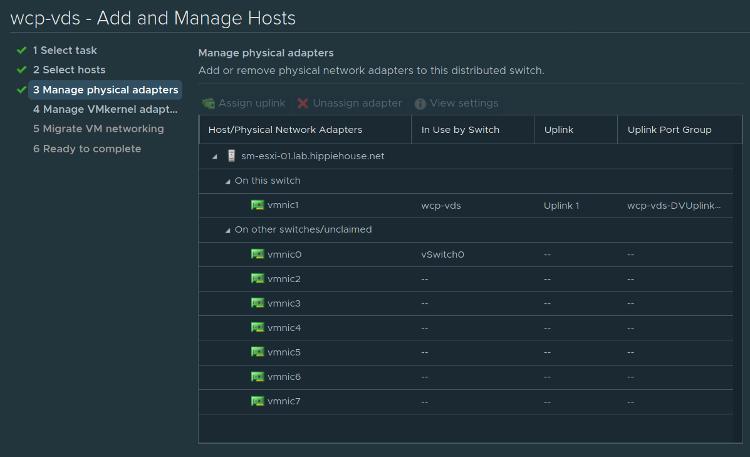
Finally (and this is the crucial part), you need to move your ESXi host's vmk0 (i.e. VMKernel adapter) interface over to your VDS. Go back and right click your VDS, then click "Add and Manage Hosts". Add in your host(s). When it comes to managing physical adapters and VMKernel adapters, I'm just going to show you images of my setup.
Physical Adapters
VMKernel Adapters
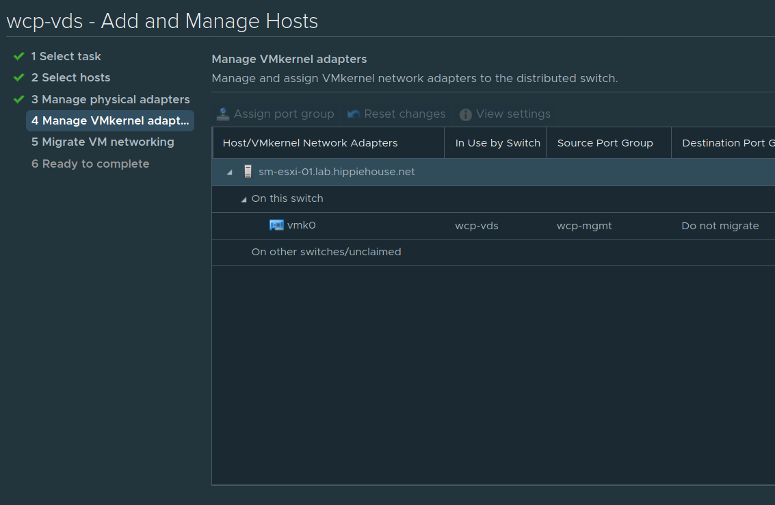
We have moved the vmk0 adapter for our ESXi host OFF of the default vSwitch0 and ONTO the VDS that we created. Please use caution and, if possible, grab a Vsphere expert here. It is easy to brick your host if you're not careful with this step.
Deploy the HAProxy appliance
That's it! You've configured your home network to support a Workload Management deployment with Vsphere 7u1. I'll again refer to Cormac's post (linked at the start of this post) for details on how to deploy your HAProxy appliance. Your litmus test for success is being able to SSH into your HAProxy appliance after deploying it. If that succeeds, you're not guaranteed success with your deployment but you have a higher chance for success.
In Summary
It can feel overwhelming, especially if you don't have a strong background in Vsphere and datacenter management. But, like anything in your daily life, you're capable of learning this and making it work for you. Don't get discouraged by the failures, and don't let the successes go to your head. Enjoy!