Problem
User management is not part of Kubernetes. You have to tie Kubernetes to an external system. This gets.... complicated.
Solution
For TKG, we can hook our Kubernetes clusters up to any OIDC provider. For this excercise, we'll use Okta. At a high level, here's what we'll do.
- Create a new 'app' in Okta. This will give us our OIDC endpoint.
- Deploy a management cluster, configuring it to point to our Okta app
- Update our Okta app with a callback URL (created during the management cluster creation process)
- Generate kubeconfig and test
- Create RoleBinding and finalize
This has some big advantages, most notable is the centralizing of user management. If you grant access to k8s clusters just based on group membership, you can easily add/remove people from your cluster just by updating your IDAM. No k8s management necessary.
We'll assume that we already have at least one user/password combo in Okta. Doing that is outside the scope of this post.
This post references the following official docs:
Create Okta App
UI's change all the time so instead of showing you a visual that will be obviated by the next update, here's the simple text-based version.
- Under "Applications" -> Create a new app integration.
- Sign-on method: OIDC - OpenID Connect
- Application type: Web Application
After creation, make note of the following details. You'll need them for your management cluster creation
- Client ID
- Client secret
- Okta domain
With that done, let's make our management cluster.
Create Management Cluster
Let's take the easy route and start the Management Cluster creation GUI with:
tanzu management-cluster create -u
Fill out the relevant parts for your environment. For the OIDC part, fill in the details you noted from your Okta app (visual below).
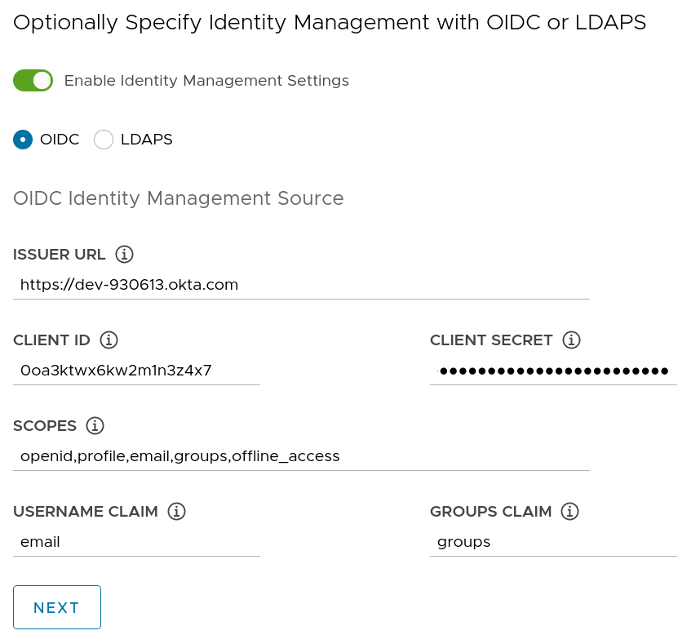
So thats:
- Issuer URL - the URL Okta gave you
- Client ID - the client ID Okta gave you
- Client Secret - the client secret Okta gave you
- Scopes -
openid,profile,email,groups,offline_access - Username Claim - email
- Groups Claim - groups
Continue on and finish deploying the cluster. Move on to the next section when it's complete.
Update Okta App with Callback URL
As part of the management cluster creation, TKG created a load balancer for you. In Amazon, it's an ELB, in Azure, it's whatever Azure calls their load balancers. On vSphere, you should have a public IP that's been created for you. Regardless, the method for finding that callback URL is the same.
You should have been given the kubeconfig as part of the cluster creation process. Just in case that's not the case, here's how to fetch it:
# fetch admin kubeconfig for 'id-mgmt-test' management cluster
tanzu management-cluster kubeconfig get id-mgmt-test –admin
Change your context over to your management cluster and:
kubectl get all -n pinniped-supervisor | grep -i LoadBalancer
The output should look something like this:
service/pinniped-supervisor LoadBalancer 100.66.66.80 a6a11a2d02a3reallylongname-572278375.us-east-2.elb.amazonaws.com 443:31862/TCP 14d
The 'EXTERNAL-IP' column is what you want. In this case, it's a6a11a2d02a3reallylongname-572278375.us-east-2.elb.amazonaws.com.
Go back into Okta and edit the App you created. Find the field for the callback URL and put that URL into the callback field. Going along with the example from above, the value should look like this (don't forget the https!!):
# example callback URL
https://a6a11a2d02a3reallylongname-572278375.us-east-2.elb.amazonaws.com/callback
Now let's test it.
Generate Kubeconfig
Here's the cool part! You don't have to make a kubeconfig file for every individual user. Because you've offloaded all the auth work to your OIDC provider (in this case, Okta), you can just make a generic kubeconfig and hand it out to anyone who needs access.
Generate your generic, non-privileged kubeconfig:
# fetch non-admin kubeconfig
tanzu management-cluster kubeconfig get --export-file /tmp/user-kubeconfig.yml
And now test it. NOTE: This command will still ultimately fail because we haven't implemented authz yet (that's in the next section!).
kubectl get pods -A --kubeconfig /tmp/user-kubeconfig.yml
This should cause a browser to open, navigating us to Okta, where we log in with our username and password combo.
Note, that we're doing this with an auto-browser launch but you can disable this behavior if you want. Before generating your generic kubeconfig, set the following environment variable:
# disable browser launch for kubeconfig (set before creating said kubeconfig)
export TANZU_CLI_PINNIPED_AUTH_LOGIN_SKIP_BROWSER=true
If you do this, the CLI will give you a URL that you can navigate to yourself. Great for those of us running the tanzu CLI in headless VMs.
After a successful login to Okta, you should get redirected back to your terminal, and the command will go through. Unfortunately, we haven't implemented any authz, so you'll hit a permissions failure. Let's fix that in the next step.
Create RoleBinding for Users
Let's keep it simple and just fire a command. Yes, it's imperative. Yes, it's granting an admin role. But we're just here to take things for a test drive. Creating fine-grained Kubernetes RBAC is an exercise for another post.
kubectl create clusterrolebinding id-mgmt-test-rb --clusterrole cluster-admin --user user@example.com
Now that that's out of the way, go ahead and re-run that previous command. It should Just Work because 1) you've already authenticated to Okta and 2) we now have the RoleBinding in place.
kubectl get pods -A --kubeconfig /tmp/user-kubeconfig.yml
We should now see success! Congrats! You now have the foundation for nice and simple user management in your Kubernetes clusters.
Last Thoughts and Day 2 Operations
It's worth pointing out that we've only created the management cluster. However, every workload Kubrernetes cluster that you create will inherit these configs. This also means that you can update the configs on all of your workload clusters by simply updating the config on your management cluster. Here's the command to make that edit.
Change your context to your management cluster and:
kubectl -n pinniped-supervisor edit Oidcidentityproviders/upstream-oidc-identity-provider
Make the change, and the configs will flow downstream to all your workload clusters as well. Yay ClusterAPI!
One less thing out of your way so you can get back to solving the interesting problems.